Hello Everyone! Thank you for your continued and loyal patronage to my site, I really appreciate all your support and love!
I have decided to stop posting, regularly anyway, on this site. Unfortunately, cooking and baking is getting pretty expensive and without regular employment to fund my culinary explorations, I must go on a hiatus. Besides, I should focus on finding a job anyway, right?
Thank you again! Happy Kitchen Adventures!
Tuesday, June 29, 2010
Friday, June 25, 2010
Smoky Deviled Eggs with Greek Yogurt
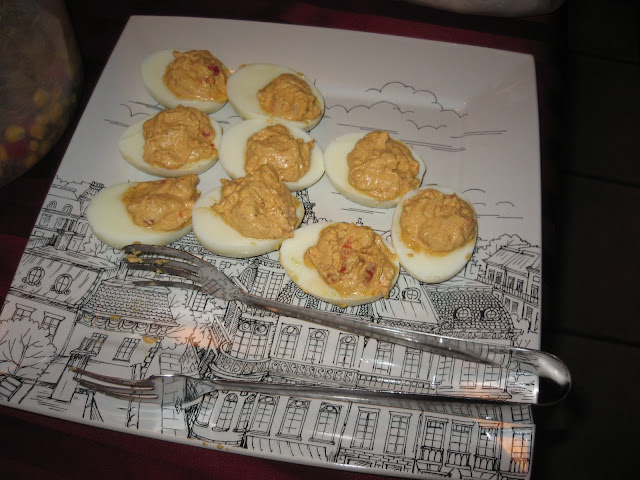
I love Greek Yogurt, so when I saw this recipe on The Kitchn, I knew I had to try it! I have to say, they turned out okay, not the best, but honestly, it's not because of the recipe its because I substituted regular paprika for smoked paprika, which is probably a no-no. I think that caused things to turn out not as well as I had hoped, but that's okay, they were still decent. I love sun dried tomatoes, so I think I added a bit more.
3.5 stars out of 5.
________________________________
Recipe from here.
Smoky Deviled Eggs with Greek Yogurt
makes 12
6 eggs, hard boiled and peeled
1 cup Greek yogurt
2 tablespoons sun-dried tomatoes, finely chopped
1 teaspoon smoked paprika
1 teaspoon salt
1 shallot, thinly sliced
1/4 cup oil
Slice the eggs in half and scoop out the yolks into a bowl. Set the whites aside. Smash the yolks with the back of a fork. Add 1/2 cup Greek yogurt and stir until well combined. Add the remaining yogurt 1 tablespoon at a time until you reach the desired consistency. (I like mine very creamy, so I used the whole cup.)
Mix in the sun-dried tomatoes, smoked paprika and salt.
In a small saucepan, heat oil over medium heat. Test the oil with a slice of shallot – when it instantly sizzles, it's ready. Add the shallot slices to the pan and cook until they turn golden brown. Using a slotted spoon, remove them from the pan and place on a paper towel. While they're still hot, sprinkle lightly with salt.
Using a small spoon, fill each egg white with a generous amount of filling.
If serving immediately, top each one with a frizzled shallot. Or, cover with plastic wrap and refrigerate. Top with shallots right before serving. Best if eaten within a few hours.
Tuesday, June 22, 2010
Double Peanut Butter Chocolate Cookies
Another item I made for the Relay for Life bake sale and forgot to take pictures of, oops! Hehe, oh well! I used to love getting the Eating Well magazine because it had pretty good recipes (they looked good anyway) and it had a lot of interesting facts and tips in it. Of course, part of the allure was that I got it for free at work...oh well. Some of the comments said they omitted the extra canola oil altogether and it turned out great, but I think that would make a more cakey cookie. If you're all for that, hey great, more power to you, but I wanted something with the consistency not synonymous with "low-fat." I think this cookie meets that because it's really not quite low fat. It has a cup of peanut butter in it, but it's all natural peanut butter so you can feel a little bit better about eating these. I followed the instructions and used the chunky peanut butter, but honestly, I didn't really like the taste of the peanuts in it, I liked the crunchiness it afforded, but not the taste of the peanuts. I think it's because I like my peanuts salted and roasted--which, well, that would defeat the healthy part of that, wouldn't it? These turned out pretty decently, but they're definitely not super sweet but they do taste rich. I like the use of the turbinado sugar. Btw, just so you know, the measurement for the turbinado sugar at the end seemed too much to me. I really don't think you need that much. 4 out of 5 stars/Easy to make and I would make them again.
_________________________
Below from here

Makes: 3 dozen cookies
_________________________
Below from here
Makes: 3 dozen cookies
Total Time: 1 1/2 hours
Ingredients
- 1 cup chunky natural peanut butter
- 1/4 cup canola oil
- 1/2 cup packed dark brown sugar
- 1/2 cup granulated sugar
- 2 large eggs
- 3 tablespoons low-fat plain yogurt
- 1 tablespoon vanilla extract
- 3/4 cup all-purpose flour
- 1/3 cup unsweetened cocoa powder
- 1/4 cup rolled oats
- 1 teaspoon baking soda
- 1/2 teaspoon salt
- 1/4 cup semisweet chocolate chips
- 1/4 cup trans-fat-free peanut butter chips, such as Sunspire
- 1/4 cup turbinado sugar (see Note)
Preparation
- Preheat oven to 350°F.
- Beat peanut butter, oil, brown sugar and granulated sugar in a large bowl with an electric mixer on medium speed until the sugars are blended. Beat in eggs, yogurt and vanilla until combined.
- Whisk flour, cocoa, oats, baking soda and salt in a medium bowl. With the mixer on low speed, gradually add the dry ingredients to the peanut butter mixture until blended. (It will be sticky.) Stir in chocolate and peanut butter chips.
- Using a small cookie scoop or slightly rounded tablespoons of dough, place cookies 2 inches apart on ungreased cookie sheets.
- Dip the bottom of a glass in water and then in turbinado sugar. Use the sugared glass to flatten the cookies slightly, leaving a thin layer of sugar on top, rewetting the glass as needed.
- Bake the cookies in batches until they are just set and the tops appear cracked, 8 to 10 minutes. (Do not overbake or they will be dry.) Cool on the baking sheet for 2 minutes before transferring to a wire rack to cool.
Tips & Notes
- Make Ahead Tip: Store in an airtight container for up to 3 days or freeze for up to 3 months.
- Ingredient Note: Turbinado sugar is steam-cleaned raw cane sugar. It’s coarse-grained and light brown in color, with a slight molasses flavor. Find it in the natural-foods section of large supermarkets or at natural-foods stores.
Nutrition
Per cookie: 115 calories; 6 g fat (1 g sat, 1 g mono); 12 mg cholesterol; 13 g carbohydrates; 3 g protein; 1 g fiber; 102 mg sodium; 33 mg potassium.
Friday, June 18, 2010
Chewy Coconut Cookies
So sorry, I totally forgot to take pictures of these! They really weren't good looking though because my baking soda needs to be changed (aka these cookies came REALLY flat and spread like crazy--but it's such a pain because I have so much baking soda left in that stupid box it seems like such a waste to buy anymore. And switch it every month, no less.) I even tried refrigerating them as well, but with no luck. Regardless of how they looked, they were really quite good and chewy as described. I called my paper thin cookies Lace cookies, lol, and tried to make up for its flatness. Oh well! I made these for the my Relay for Life team as a fundraiser so hopefully things will go well and the appearance won't be too off-putting. Originally, I was going to not toast the coconut (i was getting lazy from all the baking I was doing that day) but honestly, what a big difference it made to toast it. Since the recipe didn't specify, I just used the sugary kind of coconut flakes, but I'm sure the natural, unsweetened kind would work as well. Besides the taste, the smell of toasted coconut wafting through the kitchen is reward enough to do it! In case you don't know how, please scroll down for quick toasting instructions, it's super easy and like I said, completely worth it. I love these as a great substitute for chocolate desserts. Blasphemous as it may sound, not everyone is a chocoholic like me, and tragically, some people are quite allergic to it as well. They are quite oily, however. They're definitely not diet food. Maybe adding more flour or using less butter would help with that, but it's so hard to tell with adjustments in baking since everything is so precise. Hope you enjoy these as much as I do! 4.5 out of 5 stars/the flatness and oiliness were turn offs, but other than that, GREAT! _________________________ Toasted Coconut Instructions: Using a baking sheet (the flat one with edges on all sides) covered with aluminum foil, spread a thin layer of coconut flakes evenly over the pan and toast for 350F degrees for 7-10 minutes until the desired level of golden brown is reached. Let cool before using.
_________________________
Below from here.
Yields around 2 dozen cookies.
Prep Time: 30 Min
Cook Time: 10 Min
Ready In: 50 Min
Ingredients
_________________________
Below from here.
Yields around 2 dozen cookies.
Prep Time: 30 Min
Cook Time: 10 Min
Ready In: 50 Min
Ingredients
- 1 1/4 cups all-purpose flour
- 1/2 teaspoon baking soda
- 1/4 teaspoon salt
- 1/2 cup butter
- 1/2 cup packed brown sugar
- 1/2 cup white sugar
- 1 egg
- 1/2 teaspoon vanilla extract
- 1 1/3 cups flaked coconut
Directions
- Preheat oven to 350 degrees F (175 degrees C.) Combine the flour, baking soda, and salt; set aside.
- In a medium bowl, cream the butter, brown sugar, and white sugar until smooth. Beat in the egg and vanilla until light and fluffy. Gradually blend in the flour mixture, then mix in the coconut. Drop dough by teaspoonfuls onto an ungreased cookie sheet. Cookies should be about 3 inches apart.
- Bake for 8 to 10 minutes in the preheated oven, or until lightly toasted. Cool on wire racks.
Tuesday, June 15, 2010
Easy Cream Cheese Brownies
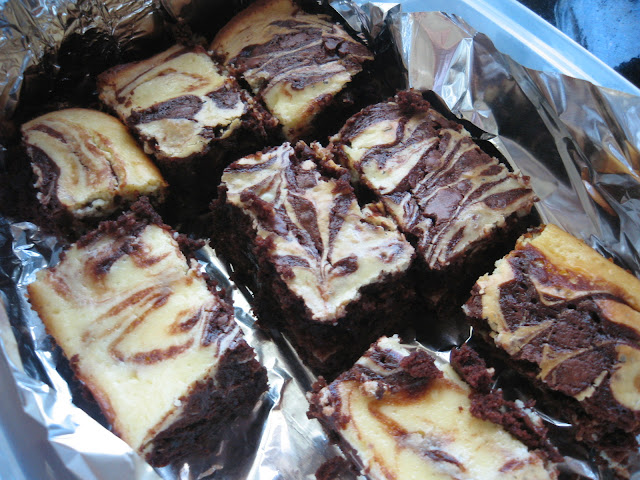
What's better than cream cheese and chocolate? Not much. Except meat.
But no, there's no meat in this. These yummy delicious, wonderful things are absolutely delicious! So easy to make since the recipe calls for a boxed brownie mix of your choice (I always go with Ghiradelli mixes because they are always quite YUMMY.) The bake time below really depends on your brownie mix. I had to bake mine closer to an hour because the Ghiradelli mix calls for 50 or 55 minutes, I forget right now. It's difficult to tell when it's done, I used the toothpick test. Either way, this was so good warm with a scoop of vanilla bean ice cream. Happy baking!
4.5 stars out of 5.
___________________________
Adapted from recipe from here.
SERVES 16
Ingredients
1 package fudge brownie mix1 (8 ounce) package cream cheese
1/3 cup sugar
1 egg
1/2 teaspoon vanilla
Directions
- Preheat oven to 350 F degrees.
- Prepare the brownie mix according to package directions.
- Pour into a greased 13x9-inch baking pan.
- Beat cream cheese with electric mixer on medium speed until smooth.
- Add sugar and mix. Add vanilla and egg; mix until well-blended.
- Place cheese mixture in dolups over the whole pan, leaving some brownie showing inbetween.
- Cut or swirl through batter several times with a knife or fork for a marbled effect. It can be tricky to get a good marble effect so be careful not to over work it.
- Bake for 35 to 40 minutes. Cool; cut into squares. (These will also freeze well).
Friday, June 11, 2010

Wednesday, June 9, 2010
More on Eggs...
8 EGG-cellent uses for Egg shells from Re-nest.com--c'mon, you know you liked that!
Either way, some really interesting tips and uses that I would never have thought possible. Enjoy!
Either way, some really interesting tips and uses that I would never have thought possible. Enjoy!
Tuesday, June 8, 2010
Chicken Enchiladas

Hm. As you can see, I forgot to take a picture of this until someone reminded me near the end. This deliciousness was gobbled up pretty quickly by one of my small groups a few weeks back.
So. Let's get down to business. As you can see, because I stuffed as many enchiladas as I could into this picture, it turned more into a casserole than individual enchiladas, but it was still quite good tasting. I doubled the recipe for us and used two cans of cream of mushroom and simplified things for myself by buying one of those lovely lemon pepper rotisserie chickens from the grocery store. The chicken tasted great...almost like I cooked it myself. LoL. Oh man, yea right. Maybe after a few years, meat is a whole new level of cooking I'm not ready for. Oddly enough, I also misread the recipe and bought corn tortillas too, instead of flour. They worked just fine so long as you heat up a frying pan with no oil or butter or anything, and just heated up the tortillas prior to filling and folding them over so they didn't crack. I also used nonfat milk and everything turned out great so there's some wiggle room for that part. Happy enchilada-ing!
4.5 out of 5 stars!
__________________________________
Recipe from here.
Prep Time: 15 Min / Cook Time: 30 Min /Ready In: 45 Min
Ingredients
- 1 tablespoon butter
- 1/2 cup chopped green onions
- 1/2 teaspoon garlic powder
- 1 (4 ounce) can diced green chiles
- 1 (10.75 ounce) can condensed cream of mushroom soup
- 1/2 cup sour cream
- 1 1/2 cups cubed cooked chicken breast meat
- 1 cup shredded Cheddar cheese, divided
- 6 (12 inch) flour tortillas
- 1/4 cup milk
Directions
- Preheat oven to 350 degrees F (175 degrees C). Lightly grease a large baking dish.
- In a medium saucepan over medium heat, melt the butter and saute the green onion until tender (about 3 to 4 minutes). Add the garlic powder, then stir in the green chiles, cream of mushroom soup and sour cream. Mix well. Reserve 3/4 of this sauce and set aside. To the remaining 1/4 of the sauce in the saucepan, add the chicken and 1/2 cup of shredded Cheddar cheese. Stir together.
- Fill each flour tortilla with the chicken mixture and roll up. Place seam side down in the prepared baking dish.
- In a small bowl combine the reserved 3/4 of the sauce with the milk. Spoon this mixture over the rolled tortillas and top with the remaining 1/2 cup of shredded Cheddar cheese. Bake in the preheated oven for 30 to 35 minutes, or until cheese is bubbly.
Friday, June 4, 2010

Subscribe to:
Posts (Atom)