Sunday, February 28, 2010

Warm Vegetable Salad

I made this for a potluck to send a friend off. We needed something healthier and greener. Overall, this is good, but I think I just got confused/messed up on some aspects. First off, I didn't research what a "bunch" of scallions meant, and I didn't really measure the parsley, which was a big mistake. I also don't have a zester or a microplane, so I made do with a smaller grater when zesting the lemon. Oooh--I also don't have white wine vinegar so I combined 1c. vinegar + 1c. white wine. Let me tell you, it doesn't produce the same effects, lol! After some research online, it is confirmed...can't substitute those for each other, they're quite different. Hilarious.

Additionally, either I'm ridiculously slow or else this recipe took a heck of a lot longer than 15 minutes prep time. It took me about 2 hours, start to finish to make this dish. Getting the scorched skin off the bell peppers after I roasted them over my gas stove is time consuming.

Either way, I put too much parsley in, and apparently not enough lemon juice. Instead of whisking the dressing together, I found shaking it in a tupperware much more effective. Also, because I had to make this ahead of time, I had to have it cold and not warm. I think that makes a big difference.

The salad was good. Made more according to the directions, it would have been much better.

3.5 out of 5 stars, probably closer to 4.5 out of 5 stars if I had followed the recipe more closely. :)

_________________________


below taken from here.

Warm Vegetable Salad

Recipe courtesy Giada De Laurentiis

Prep Time:15 min

Cook Time: 25 min
Level: Intermediate
Serves: 4 to 6 servings

Ingredients

  • 2 whole red peppers
  • 1 1/2 pound assorted red and white new potatoes
  • 3/4 pounds green beans, trimmed and halved
  • 1 bunch scallions, sliced
  • 1/2 cup chopped fresh flat-leaf parsley
  • 2 cloves garlic, minced
  • 2 tablespoons chopped oregano leaves
  • 1 lemon, zested and juiced
  • 2 tablespoons white wine vinegar
  • 1/2 cup extra-virgin olive oil
  • 1 teaspoon salt
  • 1/2 teaspoon freshly ground black pepper

Directions

Preheat the broiler. Place the red peppers on a foil lined baking sheet.

Place the red peppers under the boiler. Turning every 2 to 3 minutes cook the peppers until the skin is blistered, about 8 to 9 minutes total. Place the blistered peppers in a plastic bag. Seal the bag and allow the peppers to sit for 10 minutes to allow the skin to separate and to let cool.

Meanwhile, bring a large pot of salted water to a boil over high heat. Add the potatoes and cook until tender, about 10 to 12 minutes. Remove the potatoes to a cutting board. Add the green beans to the pot. Cook the green beans until tender, about 3 minutes. Remove the green beans to a large bowl. Slice the potatoes in half while still warm and combine them with the green beans in the large bowl. Remove the peppers from the plastic bag. Peel off the skin from the peppers. Slice the pepper flesh into wide strips and remove the seeds and veins. Place them in the bowl with the potatoes. Add the scallions, parsley, and garlic

and toss to combine.

In a small bowl combine the oregano, lemon juice and zest, and white wine vinegar. Whisk in the olive oil. Stir in the salt and pepper. Toss the warm vegetables with the herb vinaigrette. Serve immediately

Friday, February 19, 2010

One Ingredient Ice Cream

I stumbled upon this ingenious recipe for low fat ice cream from thekitchn.com. What an absolutely awesome idea. I experimented by adding a little bit of skim milk (more like non-fat lactaid, but who's counting?) while blending, but I think it's better if you kept that out. I made two batches because I had two frozen bananas. I used a blender and on the first try forgot to break or cut the banana into smaller pieces prior to blending. Do it, it helps. Also, freeze the bananas without a skin, works a lot better.

First batch: 1 frozen banana + 1/5c water + 1/3c skim milk + 1/2c assorted frozen berries (blueberries, raspberries, and blackberries) --> really good smoothie. lol, not ice cream like whatsoever, but delicious, nevertheless. Jamba Juice, move over. Not only was this better tasting, it was cheaper, and I knew exactly what was in it, no weird stuff at all.

Second batch: 1 frozen banana + 1/4c skim milk + 1 1/2 tbsp peanut butter --> soft serve banana peanut butter ice cream. Once again, really don't need the milk, and honestly I think adding a tsp or more of honey would really have made a difference. The consistency was really great, not watery like the first batch. It was so thick, it wouldn't pour out, I had to scoop the mixture out with a spoon. I added some almond slices and it was really great, added a whole new dimension to the "ice cream." I will definitely be making this again!

The great thing is you can use this recipe to make all kinds of things, any kind of ice cream concoction you want! Add peanut butter, honey, any kind of nuts, jams, chocolate chips, chocolate shavings, caramel, butterscotch...your imagination is the limit!

4 of 5 stars
______________________

Below taken from here:


That mystery ingredient, of course, is banana! The smidgen of fat in bananas makes a magic trick when they are frozen and blended up. They turn creamy instead of crumbly, with a smooth texture any home ice cream chef would love to have in their frozen treats.

Here's a step-by-step slideshow of how to do it. The major tips can be summed up as:

• Peel your bananas first.
• Cut them into small pieces.
• Freeze for just 1-2 hours on a plate.
• Blend, blend, blend - scraping down the bowl when they stick.
• Enjoy the magic moment when they turn into ice cream!

Monday, February 15, 2010

Baking Tip #2 - Crunchy Top on Brownies

The Awesome brownies I made a few posts ago had a fabulous crust on them, which I love, because its beautiful and adds an extra dimension to the brownies. So when I stumbled upon this, I got excited and wanted to share it with you. Enjoy!

_______

Below taken from here:

2009-10-26-Brownies.jpg

We consulted one of our favorite cookbooks, BakeWise, and found that this crispy top crust is actually a layer of meringue. That's right - whipped egg whites and sugar! It happens in recipes where the the butter and sugar are creamed together and then the eggs are added. The more the mixture is beaten once the eggs are added, the more prominent this crust.

If you're like us and you love the crispy top, just beat the batter as much as possible after adding the eggs and before adding any other ingredients.

Saturday, February 13, 2010

Baking Tip #1 - Baking Chocolate Substitute

3 tbsp coca + 1 tbsp butter can be substituted for 1 ounce unsweetened baking chocolate.

thanks, alton brown!

Thursday, February 11, 2010

Low Fat Banana Bread

Is there such a thing?? Why yes, there is! And it's delicious, and oh so moist and wonderful. And I ate it all. Just kidding. I wanted to, lemme tell ya. I'm still eating brownie from yesterday, good grief that stuff in decadent.

As I am just starting this blog, I don't have any pictures to put up. It's still too much a hassle to upload pictures and then resize and etc, so screw it. You get the pictures from the websites I take my recipes from, and...yea. Besides, there are so few readers, eh--maybe one day.

This blog is the product of a recent graphic design grad looking for a job in this terrible economic climate. Whomever said that unemployment equates to tons of time on his hands was wrong. There are now so many things I want to do, books I want to read, recipes I want to try. Bringing us full circle back on topic of the here and now. Low Fat Banana Bread.

Tips: I feel like less sugar can be used because its already quite sweet from the recipe. I used all apple sauce (approx half a cup, just one snack container of the no sugar added Mott's natural applesauce) and completely cut out the butter. This makes the batter more moist, so I added just a tad more flour/oats and baked it longer. I made these into psuedo-muffins by cooking them in silicone cupcake trays and the bake time would probably equate to around 40 minutes. You can get away with filling each well just a few cms short of full. I never realized til many trial and errors later that banana bread needs to be that rich brown color (but not burnt...that's black). Let them rest for a bit because you don't want them mushy. The toothpick test doesn't work on banana bread because it should come out clean about half way thru cooking. I also added a tsp of cinnamon to it too, because i like the extra dimension of flavor it provides. That's up to you, of course. Happy Baking!


********

Below taken here:

Low-Fat Banana Bread Recipe

When I substituted some of the butter with applesauce in a previous recipe, it actually made the bread more moist. I put one loaf in the freezer, but had to take it out within 24 hours because the first was devoured!
by SJG3483

55 min | 5 min prep

SERVES 12 -16 , 2 loaves

  1. Mash bananas in a bowl.
  2. Add all other ingredients and mix well.
  3. Pour into 2 greased loaf pans (or you can pour it all into one, but it rises enough that you can split it in half).
  4. Bake at 350 degrees for 50 to 60 minutes, or until toothpick inserted into center of cake comes out clean.
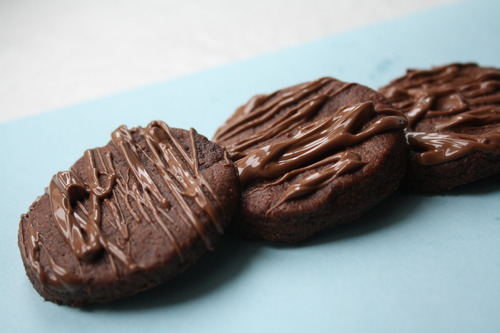
Haven't tried these yet, but don't they look scrumptious? Who doesn't love Thin Mints, especially when you don't need to spend $4 on a box that seems to somehow shrink with each passing year...

Everything below taken from here.

***

Faux Thin Mints


For about 2 dozen cookies (revised from Bon Appetit):
  • 1 1/2 c. all purpose flour
  • 3/4 c. unsweetened cocoa powder (preferably Dutch-process)
  • 1/4 tsp. salt
  • 3/4 c. (1 1/2 sticks) unsalted butter, room temperature
  • 1 tsp. peppermint extract
  • 1/2 tsp. vanilla extract
  • 1 c. sugar
  • 1 large egg
  • 6 oz. milk chocolate

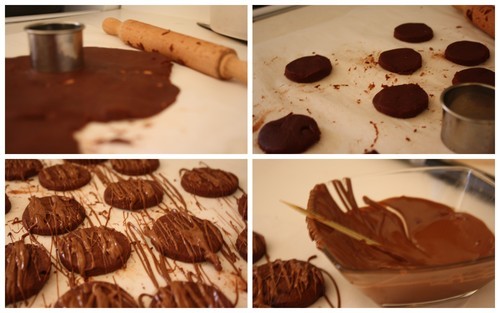
Whisk flour, cocoa powder, and salt in medium bowl to blend. Using electric mixer, beat butter in large bowl until smooth. Beat in peppermint extract and vanilla extract. Beat in sugar in 3 additions. Add egg and beat until blended. Add dry ingredients and beat just until blended (dough will be sticky). Divide dough between 2 sheets of plastic wrap. Using plastic wrap as aid, form dough on each into 2-inch-diameter log. Wrap with plastic and refrigerate dough until well chilled, at least 2 hours. Position 1 rack in center and 1 rack in top third of oven; preheat to 350°F. Line 2 baking sheets with parchment paper. Unwrap cookie dough logs; roll it out with a rolling pin and form the round cookie with a cookie cutter.

Transfer the cookies to a parchment paper lined baking sheet and bake for 15 minutes or until the cookies are firm to touch but still soft. Lay all the cookies out when they are all done baking and splatter on the melted chocolate. Wait for the chocolate to firm and cool before serving or saving.


Wednesday, February 10, 2010

Awesome Chocolate Brownies

I just tried this recipe today and it was divine, but a huge quatity.
Note: Used 1/2c applesauce with 1 stick butter, 1c Lindt Truffle Dark Chocolate Shavings added directly into mix + 1+c of semi-sweet chips, 1 tsp of baking soda + 1 tsp cream of tartar instead of 1 tsp baking powder, used a smaller pan (BAD IDEA--> uneven cooking, thick brownies, and much longer baking time--really thick, and tall too), omitted nibs altogether.

Tip: I learned that 1 part baking soda + 2 parts cream of tartar = baking powder alternative. Why in the world would I have cream of tartar? To make snickerdoodles with, duh, silly!
(I wonder if it expires
, cuz i've had it for a looooooooong time, tho never opened it...special!)

5 out of 5 stars

***

The recipe and picture below taken from here.


Yummy-Nib Brownies
Adapted slightly from the recipe on the back of the King Arthur Flour bag

1 cup unsalted butter
2 1/2 cups sugar (460 g)
1 1/4 cup Valrhona cocoa
1 teaspoon salt
1 teaspoon baking powder
1 tablespoon pure vanilla extract
4 large eggs
1 1/2 cups (6 1/4 oz) AP flour
2 cups (12-oz bag) chocolate chips (the darker the better!)
1/2 cups cocoa nibs (I use Guittard)

(note on the measurements - I try to bake as much as possible using a scale, so I convert most of the recipes I use into grams - easier to double/triple/divide than using ounces)

Preheat the oven to 350F. Line a 9" x 13" pan with parchment paper so it comes up each of the shorter sides (butter the two other sides)

Melt the butter over low heat. Add the sugar and heat up both just until it's just about to boil. This will give the brownies a crispy top crust. Transfer to a mixing bowl.

With a wooden spoon, stir in the cocoa, salt, baking powder and vanilla. Add the eggs one by one, beating until smooth and shiny. Add the flour, mix gently until it's almost completely incorporated. Add the chips and the cocoa nibs until combined.

Pour into the prepared pan. Bake for 28-30 minutes. Brownies are done when the top is firm and slightly puffed and set on the edges.

Chill in the fridge (or outside if your fridge is like mine and it's already stuffed!) until cool.